By
&
Ashley Sprouse
Current electricity moves. When a battery is connected up properly, current electricity comes from one of its terminals. It then follows a path called a “circuit” back to the other one.

Create your own circuit with:
Coated wire
A steel paper clip
Wire strippers
1.5v battery
A bulb holder 1.5v bulb
Scissors
Two paper fasteners
Thick cardboard
First:
Cut two pieces of wire. Carefully strip away the plastic ends and then twist the bare strands of wire together.
.JPG)
Second:
Firmly attach one end of each wire to each terminal of the battery. Make sure that bare wire is touching the terminal.
 Third:
Make one wire touch the base of the bulb and the other one touch the side. This forms a circuit and the bulb lights up.


Fourth:
Fix the bulb to some type of holder. Then, touch the wires to the holder. This will cause the bulb to light up again. When you break the circuit by removing one of the wires from battery, the bulb will go out. This because electricity cannot pass over the gap.


Fifth:
Wind the end of the wire from the bulb-holder around a paper fastener.
Sixth:
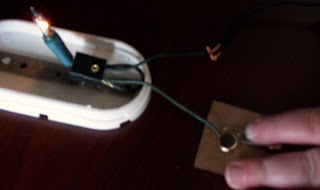
Cut a small piece of thick card board and secure the wire and fastener to it. This will be the base of a switch. Repeat this step with the wire from the battery, but, place a paper clip around this paper fastener. This should be what your finished product should look like.


Seventh:
Now, close the switch by touching the paper clip to the first paper fastener. This will cause the bulb to light up.

Link to lesson plan


Great job ladies! This was very interesting.
ReplyDeleteGreat job! You're blog for this looks great!
ReplyDeleteSo what other objects can be used instead of a paper clip to connect the circuit?
ReplyDeleteDoes it matter what type of battery you use(AAA, C, D)?
Loved the diagrams...they really helped me see what a light switch does when I turn one on and off!
Great job explaining! Very interesting.
ReplyDeleteI love that you let Andrew help with this!! He did great! And so did you guys! Good job! (so maybe younger kids would be able to do this too-in a very controlled classroom)
ReplyDeleteGreat job! I love all the pictures. I always had trouble with understanding the circuit concept and visual images help explain the process. Students would need assistance with this project but I think it would be a great learning experience!
ReplyDeleteI think that would be very intersting experiment for the class. I wonder if different battery sizes make the light brighter or darker!
ReplyDelete