Monday, April 5, 2010

Temperature and its effect on our taste

How the temperature of food affects our taste

Have you ever noticed all of those bumps on your tongue? Those are called papillae and most of them contain taste buds. Taste buds have very sensitive microscopic hairs called microvilli. Those tiny hairs send messages to the brain about how something tastes, so you know if it's sweet, sour, bitter, or salty. Did you know that the average person has about 10,000 taste buds that are replaced every 2 weeks or so. But as a person ages, some of those taste cells don't get replaced. An older person may only have 5,000 working taste buds. That's why certain foods may taste stronger to children than they do to adults. Smoking also can reduce the number of taste buds a person has. But before you give taste buds all the credit for your favorite flavors, it's important to thank your nose. Olfactory receptors inside the uppermost part of the nose contain special cells that help you smell. They send messages to the brain.

Here's how it works: While you're chewing or drinking, the food or drink releases chemicals that immediately travel up into your nose. These chemicals trigger the olfactory receptors inside the nose. They work together with your taste buds to create the true flavor of item by telling the brain all about it.

This experiment will show how the temperature of our food will influence our taste sensation. The taste buds on our tongues, that we just discussed, are sensitive to temperature. Hence, in order to taste the full flavor of the food that we eat, should we eat it when served piping hot, warm, or cool?

Hypothesis

As the temperature of sweetened water is increased, our ability to distinguish between a sweeter and a less sweet liquid is improved.

Overview : Sense of taste
Taste enables us to appreciate the flavors in our food. It is this ability that helps us discern the different flavors in our food and heightens our enjoyment of the food. The 4 basic types of taste are sweet, sour, salty and bitter. We are able to perceive taste with our tongues due to the specific areas of our tongue which are sensitive to that taste. The taste buds in these specific zones help up taste our food. When food comes into contact with our taste buds, an electric signal is generated in our tongue. This electric signal is then sent to the brain through our nerves and we immediately recognize the taste.

Scientific terms

Taste bud=contain the receptors for taste. They are located around the small structures on the upper surface of the tongue, soft palate, upper esophagus and epiglottis. These structures are involved in detecting the five (known) elements of taste perception: salty, sour, bitter, sweet, and savory

Senses= are the physiological methods of perception.

Nerves=is an enclosed, cable-like bundle of peripheral axons (the long, slender projections of neurons). A nerve provides a common pathway for the electrochemical nerve impulses that are transmitted along each of the axons.


Materials


20 male and 20 female participants
6 jugs labeled A, B, C, D, E and F
240 plastic spoons for tasting
40 plastic cups
1 wooden spatula to mix sugar and water
1 packet of sugar
6 liters of cold drinking water
Thermometer
Oven
Refrigerator
Spoon to mix the sugar
Small weighing machine to measure 20g to 100g weight.

Procedure

1. For this experiment, the independent variable is the sweetness of the water and the temperature of the sweetened water. The dependent variable is the perceived sweetness of a sample from each jug by the participants. This is determined by having the participants do a taste test and through filling in a simple questionnaire. The constants (control variables) are sugar as the taste element.

2. The sugar is added and mixed with the drinking water inside the jugs according to the ratio given in the table below. The jugs are also marked accordingly.

Mixture Sugar Water
Jug A 10 grams 1 liter
Jug B 20 grams 1 liter
Jug C 50 grams 1 liter
Jug D 60 grams 1 liter
Jug E 90 grams 1 liter
Jug F 100 grams 1 liter

Directions:

1. Put all jugs in the refrigerator/freezer to bring the temperature of the drinks to 10 0C.

2. Take out all the jugs and instruct the participants to use a plastic spoon to take a sample from each jug. They are to compare Jug A versus B, Jug C versus D and Jug E versus F.

3. After tasting the sample, they are to spit out the contents into a plastic cup.

4. Fill in the first column, ticking the 3 jugs that tasted sweeter when compared to the other sample. (e.g. Jug A is sweeter than Jug B. Therefore, tick A at 10 degrees Celsius)

5.The procedure above is repeated by bringing the temperature of the sweetened water to 20 0C (almost room temperature), 30 0C and 40 0C. (An oven maybe used to raise the temperature of the water.)

6. The participants are given a form to fill out the result of their tasting experiment. Calculate the number of ticks for each comparison and find the percentage that chose B over A, D over C and F over E.


7. Tabulate your results.

Observation/Conclusion

The hypothesis that increased temperature of the food increases our ability to distinguish sweetness levels is proven to be true. If we are able to perceive sweetness better with our tongues, when food is warmer, we can then cut down our sugar intake by switching from cold to hot drinks. This way, we will be consuming less sugar and satisfying our cravings at the same time! And a new study identified microscopic channels in our taste buds- termed TRPM5- as being responsible for different taste perception at different temperatures. According to the research, the reaction of TRPM5 in our taste buds is much more intense when the temperatue of food or fluid is increased, sending a stronger electrical signal to the brain and resulting in an enhanced taste.

Other things to consider
1. The experiment can also be done using salt instead of sugar.

2. What is the ideal temperatue of food for it be perceived as tasty?

3. Would placing a sweet at the back of our tongues result in a reduced ability to perceive or taste sweetness as compared to placing it at the front of the tongue?

4. Could having a cold change the outcome of this experiment?


Other Resources
Senses By Tiffany Phillips

Monday, March 29, 2010

Sunday, March 28, 2010

Crush with air

Can you really crush a bottle with air???

By: Angela Bibbins

You really can make a plastic bottle collapse without touching it! The air does the job for you. You cannot feel air, but it presses against every surface. This is called “air pressure.”


To do this experiment you will need the following items:
1.A bag of ice
2.A funnel
3.A cup for hot and cold water
4.A plastic soft drink bottle
5.A bowl


1st Step: Stand the bottle upright in the bowl and fill it about half full with hot water. Leave the lid off for a short amount of time.

2nd Step: Screw the top on the bottle and lay the bottle down inside of the bowl.


3rd Step: Pour ice and cold water over the bottle.


4th Step: Stand the bottle up and watch it collapse!

5th Step: As the warm air inside the bottle cools, it exerts less pressure. The pressure of the air outside is stronger and crushes the bottle.


Scientific Explaination

We can reduce air pressure in a container by taking out some of the air. One way to do this is by cooling the air inside to reduce the air pressure. So, when we put the closed pop bottle in the pan and covered it with the very cold ice water, the liquid cools the bottle and the air inside. This will cause the bottle to crush. Therefore, by cooling the air inside the bottle we reduced the air pressure inside the bottle. Since the air outside the bottle was at a higher pressure than the air inside, it pushed in on the walls of the bottle until it crushed them.

Lesson Plan Link

Sunday, March 14, 2010

Constructing a circuit (pg. 102)


By


Angela Bibbins


&


Ashley Sprouse


Current electricity moves. When a battery is connected up properly, current electricity comes from one of its terminals. It then follows a path called a “circuit” back to the other one.


Create your own circuit with:


Coated wire


A steel paper clip


Wire strippers


1.5v battery


A bulb holder 1.5v bulb


Scissors


Two paper fasteners


Thick cardboard


First:


Cut two pieces of wire. Carefully strip away the plastic ends and then twist the bare strands of wire together.


Second:


Firmly attach one end of each wire to each terminal of the battery. Make sure that bare wire is touching the terminal.


Third:


Make one wire touch the base of the bulb and the other one touch the side. This forms a circuit and the bulb lights up.


Fourth:


Fix the bulb to some type of holder. Then, touch the wires to the holder. This will cause the bulb to light up again. When you break the circuit by removing one of the wires from battery, the bulb will go out. This because electricity cannot pass over the gap.


Fifth:


Wind the end of the wire from the bulb-holder around a paper fastener.


Sixth:


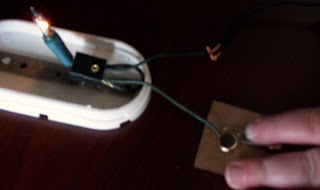
Cut a small piece of thick card board and secure the wire and fastener to it. This will be the base of a switch. Repeat this step with the wire from the battery, but, place a paper clip around this paper fastener. This should be what your finished product should look like.


Seventh:


Now, close the switch by touching the paper clip to the first paper fastener. This will cause the bulb to light up.


Link to lesson plan


What are batteries?


Batteries store electricity for appliances that you can’t or do not want to plug in. Batteries can be put in and taken out of appliances. Batteries can “run out” of electricity. Some batteries can be recharged (refilled) with electricity. Each appliance has to have the correct battery to work properly.


+ and -

The + and – signs help you to know which way the battery should be inserted. If a battery is not put in correctly then the appliance will not work!!!


Making a Circuit


A circuit is a path that allows electricity to pass through it. For electricity to pass through the circuit must be a complete loop.


The electricity flows from the negative terminal of the battery, through the bulb and back to the positive terminal of the battery. Electricity always flows from the positive (+) to the negative (-)


Switches help control the flow of electricity through a circuit

Switch on


Turning a switch on closes the switch. This completes the circuit and allows electricity to flow through the lamp.
Switch off


Turning a switch off opens the switch. This breaks the circuit and doesn’t Allow electricity to flow through the lamp.

Link to Carla's Post on Batteries

Sunday, February 28, 2010

By
Angela Bibbins
&
Erin Roth


The air is pressed inside during moving the paper banger downwards and the air suddenly is free when the inner layer is coming out. It is a small explosion. It is very similar to the way thunder sound is created. There are many variations of a paper popper, but they all involve a folded sheet of paper being gripped and propelled down, causing air to be forced into the paper's folded flaps, making the paper flaps pop out in the opposite direction at a high velocity, thus making a loud popping noise. What actually happens is that air rushes in to fill the vacuum created in the pocket that opens. Most papers work for poppers, although some are louder than others

Concepts: The popper opens out when it is snapped through the air. As it opens out, it actually catches the air and the paper is pulled open very quickly. Some resources suggest this sound is created in the same way a swift moving aircraft breaks the sound barrier.

Questions: How is this sound made?

What seems to "cause" the sound?

Materials: One full piece of newspaper for each participant.


All you need for this experiment is a sheet of stiff paper measuring about 16in. by 12in. (Printer Paper)


Step 1: Fold the longest edges of the paper together. Then open it out.


Step 2: Fold the corners into the first fold. Step


3: Fold the paper in half along the first fold. Then fold in half again lengthways.


Step 4: Open out the second fold.


Step 5: Fold down the two sharp corners.


Step 6: Fold the paper back along the second fold to make a triangle shape.


Step 7: Grip the banger firmly by the two sharp corners. Flick it down quickly- and it makes a loud bang.

Link to lesson plan

Link to Tabbitha's Blog on sound

Link to Kayla's Blog on How the ear works